
Mywifiext.net – Extender Setup
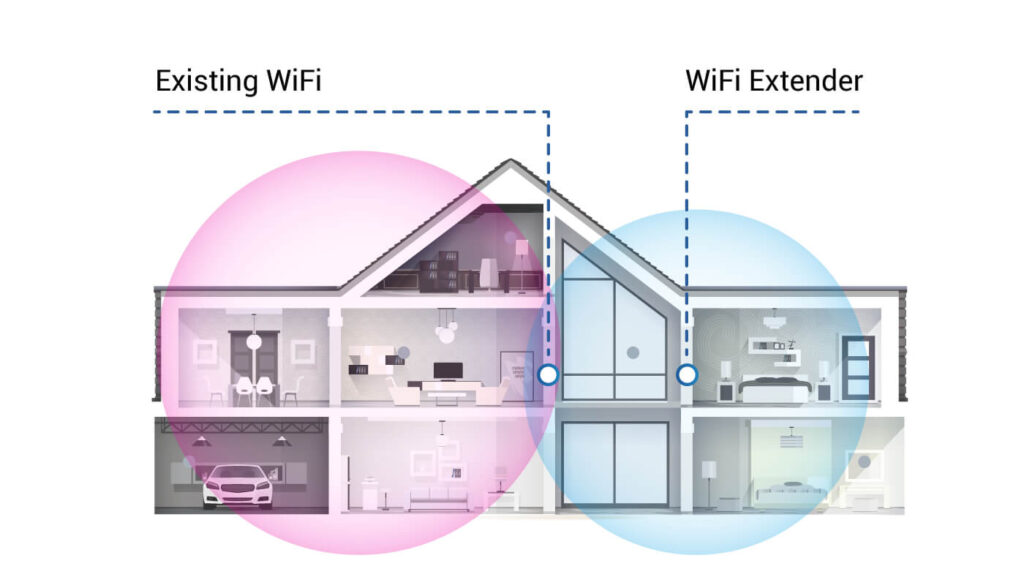
With the changing times the need for a excellent wifi connection has increased tremendously be it for work or for personal use, everyone needs a wifi with strong signal strength. While using the wifi network, we also face various issues like the uneven distribution of wifi signal for instance interrupted or no wifi signals at some places of our homes and offices. To provide with the strong signal strength and tackle with issues of interrupted wifi signals, Mywifiext provides with the Netgear Extender. The wifi extender helps in extending the wifi signals of current wifi system of the place. It is an easy to fit, install and setup wifi extender which can be done in a few easy steps. For setting up wifi range extender, the following simple steps need to be followed:
1. The first and foremost step for installation is to open the website www.mywifiext.net web page and click on new extender setup button.
2. Then login the username and password credentials in the login dialogue box.
3. After the login, Netgear Genie will open up which is a smart setup wizard to assist you with the setup
4. Follow the mentioned steps and you can setup your extender.
Connect Netgear Range Extender with WPS Method
There is many ways to connect the Netgear Range Extender with your broadband router to increase the range in your home or office. By adding Netgear Range extender in your home or office you can access the internet in every corner of your home or office. There I is three most popular way to configure the Range Extender with router which is WPS Method, Manual Extender Configuration and Using Ethernet Cable.
WPS Method
This is easier way or method to connect range extender to your router. Its very easy and anyone can do without anyone help. Its take very less time but you need to make sure all that your device should be compatible with WPS method. Some devices support WEP which cannot support WPS method.
So first step to start your setup with WPS, you need to find the WPS button on each device. Netgear Range Extender always has a WPS button on its side panel. Plug your Range Extender device to power and let its LED light become stable in Green color. Simultaneously, press the WPS button on your router and Range Extender. In just few seconds it will be connected instantly and show the mywifext.net web page on your device screens. There is no need to worry if your screen is not displaying the mywifiext.net page. It can be browse manually. Just enter the username and password to mywifiext.net login page as –
Username : admin | Password : admin
After login, just click to login and you will be connected with your router and by default extender show Range Extender SSID as Netgear_Ext. you can change the SSID in setting.
Troubleshooting the connecting issue “mywifiext.net not working”
- Open the web browser > Go to the setting > Clear the Cache, Cookie and also remove the all history.
- Press the Window + R button and type %temp% and press enter. Clear the all files kept in Temp Folder.
- If you are using cat5 cable or Ethernet connection the make sure you have connected the modem or router in proper way.
- After checking above mentioned things, reboot your computer and visit the browser > open mywifiext.net
- If mywifiext.net still not working then connect to your internet service provider to confirm the status of your internet connection.
Another process the do the troubleshooting in easy way
- Restart the computer and the Netgear wireless extender.
- Factory reset using paperclip to hold down 15 seconds until you see an orange flashing icon.
- Navigate to its internal default IP address 192.168.1.250.
- Restarting the browser and try using different browsers.
- Visit mywifiext.com instead of mywifiext.net. This works sometimes.
- Making sure the computer has no other path to connect to the internet.
- Let the device be powered up for a few minutes and try restarting the computer.
Airplay Setup, Feature & Benefits
Among the several useful features of your Netgear Range Extender, the use of Airplay Advance feature is one of the amazing features, you can utilize it to use the multimedia with efficiency. As you manage the settings of your Router via access to mywifiext.net similarly, you can manage the music using the airplay feature installed for your home network. There you need some advanced configuration as given below –
- First of all, make basic configuration of your Router, Device and Range Extender. Regardless you use the wired, wireless or WPS method, just establish the connection. Make sure your music extender device is also installed on your device successfully. For this, you can plug in your extender in the power outlet.
- Connect the Speakers to your Extender as well as connect your wireless network with the help of your device.
- From your device go to the Google Play store or iTunes and Download the Free Airplay application. If you are using the iOS device such as iPhone, iPad, iPod, etc you can download the Airplay from the Music App.
- When it is installed properly, open it and go to the music source.
- Select your heart pleasing songs play it to enjoy it.
If you are seeking to play the music on the speaker then you must connect the speakers to your extender. Your speakers should be compatible to be connected to the range extender. Click on the Beam button and select your extender (Model will be showing).
Airplay Feature Benefits
The foremost benefit is that you can play the music from any internet compatible devices wirelessly connected with your Router and Extender if it is compatible to the Airplay. No matter whether you are available in another place you can access the music player setting but you should remain under the Wifi range of your network.
Along with basic settings of your router through Mywifiext.net you can also add some other advanced features of your device. The settings with your Airplay feature enable the users for the audio streaming to play music on extender devices